How to activate a deactivated Aadhaar Card
If your Aadhaar gets deactivated, a lot of things can suddenly stop working—bank KYC, government subsidies, SIM activation, income tax e-filing, and more.
In this guide, I will tell you how to reactivate your deactivated account with easy steps.
What Does a Deactivated Aadhaar Mean?
Your Aadhaar number is given by UIDAI and it is valid for life. But in some situations, UIDAI can deactivate or suspend it.
When your Aadhaar is deactivated:
- Your Aadhaar number still exists in UIDAI’s database.
- OTP or biometric authentication may fail.
- Aadhaar-based KYC at banks, telecom companies, or government portals may not go through.
You may see errors like:
- “Aadhaar number does not exist”
- “Aadhaar inactive”
- “Aadhaar suspended”
Deactivated vs Cancelled Aadhaar
Deactivation is temporary and cancellation is permanent.
Why Does an Aadhaar Card Get Deactivated?
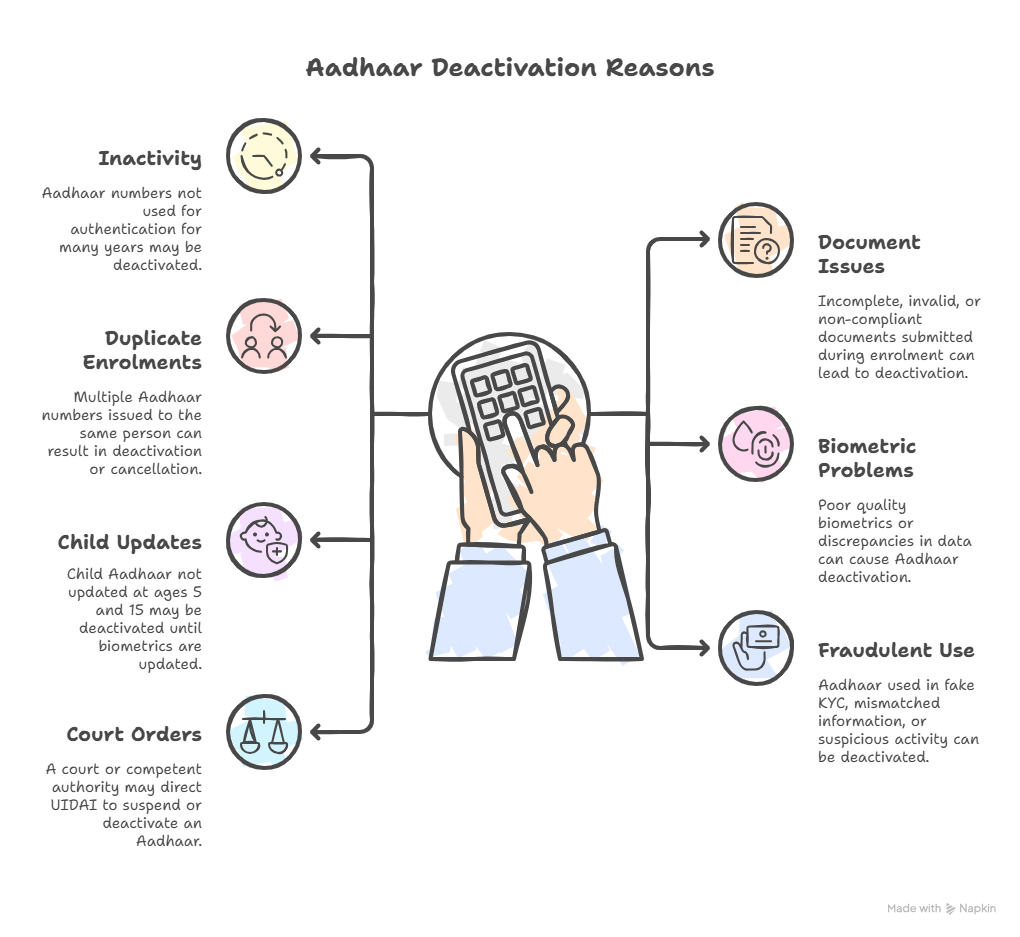
Knowing the reason helps you fix the problem faster and avoid it in the future.
Some common reasons are:
- Not using Aadhaar for a long time
- Wrong or incomplete documents at the time of enrolment
- Multiple or duplicate enrolments
- Biometric or data quality problems
- Child Aadhaar not updated at age 5 and 15
- Suspicious or fraudulent KYC use
- Court or government orders
How to Check If Your Aadhaar Is Deactivated
Before you try to reactivate it, confirm its current status.
1. Check Status on the UIDAI Website
Go to the official UIDAI site:
- https://uidai.gov.in or directly https://myaadhaar.uidai.gov.in
- Click on “Verify Aadhaar Number”.
- Enter your 12-digit Aadhaar number and the captcha.
- Click “Proceed to Verify”.
You may see:
- “Aadhaar Number does not exist”
The number may be cancelled or was never generated. - Inactive or error message
Likely deactivated or suspended — you’ll need to visit a centre. - “Aadhaar is active”
Your Aadhaar is fine. Any problem may be due to mobile linking, KYC at a specific service provider, or a local technical issue.
2. Check Using the mAadhaar Mobile App
- Install mAadhaar from the official app store.
- Add your Aadhaar using your registered mobile number.
3. Through Banks, Telecom Operators, and Other Services
Many people first come to know about deactivation when:
- A bank can’t complete Aadhaar-based e-KYC
- A SIM card can’t be activated through Aadhaar
- A government website refuses Aadhaar authentication
If KYC fails across multiple services, you should verify your status on the website.
Documents You’ll Need to Reactivate a Deactivated Aadhaar
Almost always, you’ll need to visit an Aadhaar Enrolment/Update Centre to reactivate your Aadhaar. At the centre, you must show original documents (they will scan them and return them).
Carry documents from the lists below, as per what needs to be updated or verified.
Proof of Identity (PoI) – Name + Photo
Any one of these (or as per the latest UIDAI list):
- Passport
- PAN Card
- Voter ID (EPIC)
- Driving Licence
- Government Photo ID Card
- NREGA Job Card
- Photo Bank ATM / Credit Card (where accepted)
Proof of Address (PoA) – Name + Address
For example:
- Passport
- Bank statement / Passbook
- Electricity, water, telephone, or gas bill
- Ration Card
- Voter ID (EPIC)
- Property tax receipt
- Registered rent agreement
Proof of Date of Birth (DoB) – If Needed
Such as:
- Birth Certificate
- Passport
- SSLC / Matriculation Certificate
- Any government-issued ID with DoB
- PAN (only if accepted as DoB proof under current UIDAI rules)
Proof of Relationship (PoR) – For Children or Family-Based Updates
For linking a child’s Aadhaar to a parent/guardian:
- Birth Certificate showing parent’s name
- Ration Card with family details
- Passport with family details
How to Activate a Deactivated Aadhaar Card?
The following are the steps to reactivate your deactivated Aadhaar:
Step 1: Find the Nearest Aadhaar Enrolment/Update Centre
Visit https://uidai.gov.in
Go to “My Aadhaar” → “Locate an Enrolment Center”.
Search by:
- State
- PIN Code
- City/Area
Choose a nearby Aadhaar Seva Kendra or any enrolment/update centre.
Step 2: Visit the Centre with Aadhaar Details and Documents
On the day of your visit:
- Carry your Aadhaar number (physical card, e-Aadhaar print, or just the number).
- Take all relevant original KYC documents (PoI, PoA, DoB, PoR).
For children, also carry:
- Child’s Aadhaar number
- Parent’s Aadhaar
- Proof of Relationship
Step 3: Fill in the Aadhaar Update/Correction Form
At the centre:
- You’ll receive an Aadhaar Update/Correction Form.
- Fill in the fields that need correction or re-verification, such as:
- Name
- Address
- Date of Birth
- Gender
- Mobile Number
- Email ID
- Mention (or inform the operator) that this visit is for reactivation / re-verification.
- Sign or give your thumb impression.
The operator will enter your details based on your form and submitted documents.
Step 4: Biometric Verification and Recapture
To confirm that the Aadhaar belongs to you, the operator will:
- Capture or re-capture your fingerprints
- Capture or re-capture your iris scan
- Take a live photo
For children:
- At age 5 and 15, fresh full biometrics are mandatory.
- Parent/guardian may also need to authenticate with their own Aadhaar.
These fresh biometrics help resolve:
- Poor-quality earlier biometrics
- Duplicate Aadhaar suspicion
- Identity mismatches
Step 5: Pay the Required UIDAI Fee
UIDAI charges a small standard update fee for Aadhaar updates, including re-verification.
The fee is charged per visit, not per field.
It is non-refundable, even if UIDAI later rejects the update.
You’ll receive:
- A payment receipt
- An Acknowledgement Slip with a URN or similar reference
Step 6: Track Your Request and Wait for Reactivation
Using the Acknowledgement Slip:
- Note your URN/Service Request Number.
- You can use this to track your Aadhaar update/reactivation status online.
How Long Does Aadhaar Reactivation Take?
Typically:
- It is done within a few days to a few weeks. But it may take up to 90 days.
The exact time depends on:
- The reason your Aadhaar was deactivated
- The quality and clarity of your documents and biometrics
- UIDAI’s verification workload at that time
You can keep checking the status online during this period.
How to Track Your Aadhaar Reactivation Status
Follow the steps below:
Visit https://myaadhaar.uidai.gov.in
Look for “Check Aadhaar Update Status”.
Enter:
- Your URN from the Slip
- Your Aadhaar number
- Captcha code
You’ll see the latest status, such as:
- In process
- Successful
- Rejected (with reason)
You can also re-check under “Verify Aadhaar Number” to confirm that your Aadhaar now shows as active.
Special Cases in Aadhaar Reactivation
1. Aadhaar Deactivated Due to Non-Usage
If it was deactivated mainly because you never used it:
- Usually, a fresh biometric verification at a centre is enough.
- Still, carry your identity and address documents, in case they need to reconfirm your details.
2. Child Aadhaar Deactivated at Age 5 or 15
If your child’s Aadhaar is deactivated for not updating biometrics:
Visit a centre with:
- The child’s Aadhaar number
- Birth certificate or school ID (as per UIDAI rules)
- Parent’s Aadhaar and identity/address proof
3. Aadhaar Deactivated Due to Duplicate/Fraud Suspicion
If UIDAI suspects:
- Duplicate Aadhaar for the same person, or
- Fraudulent activity involving your Aadhaar
You may face:
- Additional document requirements
- Possible field verification or inquiries
If Your Aadhaar Reactivation Request Is Rejected
Sometimes your reactivation is cancelled. When that happens, the status usually shows the reason, such as:
- The documents are blurred or not readable
- The document you gave is not on UIDAI’s approved list
- Your biometrics (fingerprints/iris) don’t match UIDAI’s records
What you can do next:
- Note down the exact reason for rejection shown in the status.
- Collect the correct documents again, making sure they’re:
- Clear and legible
- From UIDAI’s approved list
FAQs on Reactivating a Deactivated Aadhaar
Can I reactivate my Aadhaar completely online?
In most cases, no.
You’ll need to visit an Aadhaar Enrolment/Update Centre. UIDAI has to verify your biometrics and see your original documents, which cannot be fully done online.
Is there a separate “reactivation fee”?
No, there is no special or extra “reactivation fee.”
You simply pay the usual Aadhaar update fee (for updating your demographic or biometric details) at the centre. Reactivation is included in this update process.
What if my Aadhaar number is deactivated and I’ve also forgotten or lost it?
You can recover your:
- Aadhaar number (UID), or
- Enrolment ID (EID)
by using the “Retrieve Lost UID/EID” option on the UIDAI website, through your registered mobile number or email.
Stay informed with the latest Aadhaar instructions through My Aadhaar UIDAI Guide.